Antioxidant Cherry 7up - Falsely Advertised


In yet another example of deceptive marketing of less than healthy food products by major food and beverage companies, 7Up has heavily marketed its "Antioxidant Cherry 7Up" drinks in both regular and diet versions with prominent images of natural cherries on consumer ads and packaging labels.

Unwitting consumers might take a look at the drinks 7Up introduced last year and ask what could be so bad about a soft drink that contains "natural flavors", no caffeine and now antioxidants too? Perhaps taking a close look at what the "antioxidant" content is, and the rest of the ingredients that make up regular and diet Antioxidant Cherry 7Up might give an entirely different picture than the one being promoted by 7Up.

Despite the deceptive way that Antioxidant Cherry 7Up is being advertising and packaged. it does not get any of it's "antioxidant" power from natural antioxidant powerhouse cherries. What 7UP bases its "antioxidant" claim on is the inclusion of a tiny amount of a synthetic form of Vitamin E (dl-alpha Tocopherol Acetate) that provides a mere 10% of the recommended daily allowance (RDA) of vitamin E.

The RDA of natural Vitamin E is only 22 International Units (IU) per day to begin with, which is extremely small compared to the most commonly recommended amount of supplemental vitamin E for adults of 400 to 800 IU per day. On top of that, synthetic Vitamin E is 33% less bioavailable than natural Vitamin E. Recent studies have indicated that the natural forms of Vitamin E, such as d-alpha Tocopherol or the even better mixed tocopherols that contain alpha, beta, gamma and delta tocopherols, are not only more bioavailable but also more biologically active than the synthetic forms.

It is the synthetic form of Vitamin E that has been used in mainstream studies which purport to disprove the benefits of natural Vitamin E which have been reported in other studies. In one highly publicized mainstream study, the Select" study, we were even warned about dangers of taking Vitamin E. So, with a mere 2.2 iu (0.0022 grams) of a synthetic form of Vitamin E that mainstream medicine has told us has no proven benefits and might even be harmful, 7Up is telling consumers that they have a healthy "antioxidant" drink.

Besides the tiny amount of synthetic Vitamin E, Antioxidant Cherry 7Up also includes carbonated water, high fructose corn syrup (from GMO corn of course), citric acid, "natural flavors", potassium benzoate, and red dye #40.

The dangers of high fructose corn syrup have been well chronicled in recent months, as have the dangers of GMO corn. Though 7Up lists 8 ounces as a normal serving size, the most commonly sold size is the 20 ounce bottle and its high fructose corn syrup content is equivalent to 15 teaspoons of sugar. Dietary guidelines recommend that we limit added sugars to about 8 tsp a day for an average 2000-calorie diet.

Red dye #40, also known as Red 40, has been shown to produce toxic psychological and behavior results such as extreme hyperactivity to psychotic behavior and extreme mood swings. In the past, Red Dye #40 was made from coal tar, now it is made from petroleum. It's chemical name is 6-hydroxy-5-(2-methoxy-5-methyl-4-sulfophenylazo)-2-naphtalenesulfonic acid sodium salt".

Citric acid and potassium benzoate in combination can create the toxic chemical compound known as benzene, a known human carcinogen (cancer causing agent) that has been linked to leukemia.

It gets even "better" with the diet version of Antioxidant Cherry 7Up. Instead of the usual Splenda used to sweeten regular Diet 7Up, Diet Antioxidant Cherry 7Up uses Aspartame.

Drink up!


Sources included:


About the author

Tony Isaacs, is a natural health author, advocate and researcher who hosts The Best Years in Life website for baby boomers and others wishing to avoid prescription drugs and mainstream managed illness and live longer, healthier and happier lives naturally. Mr. Isaacs is the author of books and articles about natural health, longevity and beating cancer including "Cancer's Natural Enemy" and is working on a major book project due to be published later this year.


Dessert Recipes for the Holidays

Banana Cream Pie, Snickerdoodles and Homemade Peanut Brittle


The smells of the holidays are everywhere. Even Safeway is baking apple pies and all kinds of breads and sweets. They all look delicious, but are they? Yes, they look okay but do they compare with homemade? Many families will be visiting and it is imperative to have the absolute best desserts ready to feed everyone. Here are a few very easy holiday favorites.


Pies for Dessert


When anyone thinks of Thanksgiving the very first thought that comes to their mind is making pies for dessert. Even Martha Stewart and the Barefoot Contessa are baking pies, but they look slightly difficult. So for an easy to make pie, why not try this one.


Banana Cream Pie With Ice Cream


  Ingredients


  • One 9 inch graham cracker pie crust
  • 1 package of instant banana cream pudding
  • 2 cups of milk
  • Whip Cream topping
  • 2 bananas
  • Chocolate topping


Method to Prepare the Pie

  1. Prepare the banana pudding, using two cups of milk with the mix and bring to a boil. Continue to stir until the pudding is thick.
  2. Remove the pudding from the stove to cool. Pour the prepared pudding into the pie crust.
  3. Let the pie completely cool. After the pie has cooled, slice one banana and place the banana slices around the pie.
  4. Scoop the whip cream on top of the pie and take the second banana and place slices of banana all over the top of the pie. Drizzle some chocolate syrup all over the entire pie.
  5. Place the pie in the refrigerator to cool for at least three hours. Slice and serve.
  6. Serve with vanilla ice cream on the side.


Snickerdooles (Cookies)


Ingredients

  • 2 3/4 cups of flour
  • 1 teaspoon of baking soda
  • 1/2 teaspoon of salt
  • 1/2 cup of shortening + 1 stick of butter softened
  • 1 3/4 cup of sugar
  • 1 T. of cinnamon + 2 Tablespoons of sugar
  • 1 large egg


Method to prepare the Snickerdoodles

  1. Place the shortening, butter and sugar in a mixing bowl. With a mixer, blend for 3-5 minutes or until light and fluffy. Add in the egg and mix well.
  2. Mix the dry ingredients together and slowly add the flour mixture to the butter mixture. Mixing well after each addition.
  3. Mix the cinnamon and the 2 tablespoons of sugar together. Take one small ball of the cookie mixture and roll in the cinnamon and sugar mixture. Place on a greased cookie sheet and flatten the balls slightly. Do this procedure to the entire batch of cookies.
  4. Bake in a preheated 350 degree oven for 12 minutes. Cool completely before placing in a sealed container.


How to Make Peanut Brittle


Ingredients for Peanut Brittle

  • 20 ounces of raw peanuts
  • 2 cups of sugar
  • 1 cup of water
  • 1 cup of corn syrup
  • 1/2 teaspoon of butter
  • 1/4 teaspoon of salt
  • 1/2 teaspoon of baking soda


Method for Making Peanut Brittle

  1. In a large saucepan, dissolve the water, sugar and syrup. Cook the sugar mixture until it reaches 240 degrees on a candy thermometer.
  2. Add the salt, butter and peanuts. Keep cooking and stirring constantly so that it does not burn, till the temperature reaches 300 degrees.
  3. Remove from the heat and quickly add in the baking soda. Mix the candy mixture well.
  4. Pour on a warm buttered cookie sheet plan. Spread the mixture quickly with a buttered spoon.
  5. Let the candy cool and then break into pieces. Yields two pounds.
Not only is there a pie recipe here, but cookies and the ultimate favorite peanut brittle. Every movie on TV will have huge cans of peanut brittle and now it is available and ready in the kitchen for the entire family to enjoy.

Learn How to Cook Ribs

Barbequeing, Braising, Baking and Boiling – Which Method is Best 


Learning how to cook ribs is easy and it does not take days to learn.  In a few simple steps, anyone can cook ribs and be the hit of the party.

There is nothing better than a plate full of barbecued ribs and cole slaw. Add in a side plate of steak fries, a feast fit for "Kings." Cooking ribs takes a bit of time, but it is well worth the effort. Here are some real easy tips on how to choose the perfect rib, with easy ways to cook them.

Ribs are considered southern comfort food, but they are also one of the top requested picnic foods. Knowing exactly how to cook them, where they are falling of the bone and "finger-licking good" is the trick. The first thing that needs to be known is which ribs are the best.


Different Kinds of Ribs


1. Beef Ribs

*Beef back ribs - These ribs are very tender and suitable for grilling. They have less meat on them, but very delicious and the most requested of the two.

*Beef spare ribs - Beef spare ribs have much more meat and come in large racks (Manly Portions). They are very inexpensive and are easily cooked in the oven and then barbecued on the grill.


2. Pork Ribs

*Baby back ribs - The ultimate favorite is baby back ribs. They are tender and delicious. They are full of meat and enough to feed any hungry crew.
*Spare ribs - The spare rib has more meat than the baby backs and is very delicious also. They are the favorite of many, as they are less expensive than the traditional back back ribs.


Different Ways of Cooking

1. Braising

Braising is where the ribs are cooked in some hot oil, such as virgin olive oil and brown them first. Then the ribs are placed in a crock pot, oven or boiled on top of the stove for tenderness.


2. Grilling

When ribs are grilled they are marinated with olive oil and some spices, such as garlic, salt, pepper, some of Emeril's Cajun Spice or some delicious Asian spices, first for two hours or more. Then place the marinated ribs on a grill to finish cooking. Try some of Bobby Flay's Asian spiced rubbed ribs.

3. Barbecuing

Barbecuing is merely ribs that have been cooked in barbecue sauce prior to grilling. They are more flavorful, if they have been slow cooked in barbecue sauce first. Afterwards, place them on a hot grill for 15 minutes to make them slightly crusty on both sides.


4. Baking Method

The ribs are seasoned and then placed in a large baking dish with some water or barbecue sauce, covered with some foil and then cooked on very slow heat for several hours. Cook them till they are almost done and then grill them. Place them under the broiler for a few minutes, instead of using an outdoor grill.
Rachel Ray's rib recipes with beer, look here. She places the ribs in the oven first for 15 minutes and cooks them slightly and then places them in a crock pot.

Cooking ribs has been a family treat for years and years and now it can be one that is enjoyed by the entire family. Whether it is braising, boiling, baking or the family favorite barbequeing, ribs are easy and simple to make.

Quick and Easy Chicken Curry with Rice


Hot and Spicy Curries from India with Hot Chilies and Ginger


 Curry is a traditional stew-like meal that is very hot. It is served over rice and can be cooked with either chicken or fish. If using fish add it at the very end of cooking, as it takes only a few minutes to cook It is traditionally very hot, but for the ones with weak stomachs, lessen the spices and cut the chilies in half, removing all seeds. 

Ingredients of the Chicken Curry


  • 2 chicken breasts or fish fillets, cut into small pieces
  • 2 tablespoons of virgin olive oil
  • 1 tablespoon of ghee or butter
  • 3 green chilies, diced
  • 1 large onion, peeled and chopped
  • 4 cloves of garlic, peeled and minced
  • 1 1/2 inch of fresh ginger, peeled and minced
  • 1 large can of tomatoes or 5 medium tomatoes
  • 1 eggplant, sliced
  • 2 tablespoons of curry
  • salt to season

Cooking Instructions
  1. Using a wok or heavy bottom skillet, place the oil and the butter in the pans. Let the oils heat till very hot and add the diced chilies, onions, garlic and ginger. Stir fry these items quickly in the hot oils. Add in the sliced chicken pieces. Brown the chicken pieces and cook all the veggies until tender and lightly brown.
  2. Add in three cups of water and the tomatoes. Mix very well and then add the spices. Evenly coat all the veggies with the spices. Add the cut pieces of eggplant. It is not necessary to soak the eggplant.
  3. Cook the curry mixture until thick and greatly reduces as in a thick soup. The eggplant and chicken should be tender and thoroughly cooked.
  4. Note: Fish fillets may be used instead of chicken, but add in the very end of cooking as it takes only a few minutes. Substitute any other vegetable also permitted. if eggplant is not desired.

How to Make Basmatti Rice

No Indian curry could be complete without a plate of basmatti rice. If basmatti rice is not available, use any other rice.
Bring one liter of water to boil. Add in one cup of thoroughly washed rice and 1/2 teaspoon of salt. Mix the rice and salt together well. Add in 1/4 teaspoon of turmeric. Cook the rice for 30 minutes or until tender. Drain the excess water off and return to the hot pan. Fluff with a fork and place a lid on top to keep the rice hot.


Hot to Plate the Meal

Again fluff the rice with a fork before using. Divide the rice into two different plates. Top with the eggplant curry mixture and then sprinkle with some chopped coriander. Around the edges of the plate placed some sliced cucumbers.


Recipe for Tomato Cucumber Raita


The perfect side dish for curry is always some tomato cucumber raita.
  • 1 cup of yogurt
  • 1 tomato, chopped
  • 1 large cucumber, peeled in sections and chopped
  • 1/4 teaspoon of chili powder
  • 1 jalapeno pepper, diced very tinyt
  • 1 teaspoon of garam masalsa
  • Salt and pepper to taste

Mix all the ingredients in a medium side bowl. Chill in the refrigerator for half an hour and then top with some olive oil and freshly chopped coriander.
A perfect meal for any two people who are really hungry. Serve with plenty of ice tea and water, as this meal is really hot. A meal that will leave the everyone wondering how to cook more Indian food.

Healthy Recipes with Turkey Breasts

Turkey Salad, Panini Made With Cantaloupe and Pizza With Arugula 

Turkey is low in fat and very delicious. Why not start a tradition that the whole family will be pleased with.


Turkey Salad with Apples

  • 1 cup of sliced and chopped turkey breast
  • 1 whole apple, peeled and chopped
  • 3 stalks of celery with the leaves, chopped
  • 2 tablespoons of yogurt
  • 1/2 teaspoon of Mrs. Dash Seasoning
  • Salt and Pepper to taste
Place all the ingredients in a large bowl and enjoy. For added pleasure, sprinkle with some parmesan cheese.


Turkey Panini with Cantaloupe

  • 8 slices of very thin whole wheat bread
  • 4 thin slices of cantaloupe
  • 4 thin slices of turkey breast
  • 1.5 cups of mozzarella cheese shredded
  • Fresh basil leaves

Method of Cooking Panini
  1. Place four slices of bread on a tray. Top each slice of bread with some shredded mozzarella.
  2. Next on top of the cheese, add the turkey and top with a thin slice of cantaloupe. On top of the cantaloupe, add another layer of cheese topped and several basil leaves.
  3. Place a top layer of bread on each sandwich.
  4. Place on a grill that has been oiled slightly and grill each sandwich. Cut in half when finished and serve with a delicious arugula salad.


Turkey Pizza Topped With Arugula Salad:

Basic Pizza Dough
  • 1 cup of brown flour
  • 1/4 cup of yogurt
  • 1/8 cup of virgin olive oil
  • 1 teaspoon of baking powder
  • dash of salt
  • Warm Water as needed

How to Make the Pizza Dough
  1. Place the flour on the counter and make a hole in the middle.
  2. Add in the center of the flour, the yogurt, oil, baking powder and salt. With a fork, slowing incorporate the flour and the other ingredients. Adding in the warm water, as needed to make a soft dough.
  3. Knead the dough for 5 minutes and then spray with some olive oil. Cover the dough with a bowl, right on the counter. Let rise for 2 hours.

Ingredients for the Pizza
  • 1/2 cup of pizza sauce
  • 1cup of chopped turkey breast
  • Mozzarella and Parmesan cheese mixed

Preparing the Pizza
  1. Roll out the pizza dough into a circle. Place on a greased pizza pan or baking dish.
  2. Spread a thin layer of pizza sauce.
  3. Top with some chopped turkey.
  4. Sprinkle the cheeses around the whole pizza.
  5. Bake in hot oven of 450 degrees, until the dough is brown and the cheese is melted.
  6. Remove from the oven and top the pizza with a salad made of arugula and red onions. Spritz the salad with some extra virgin olive oil and lemon juice before placing on the pizza.

Three delicious recipes for the holidays or in fact any day. Enjoy being healthy and feeling happy with these celebration meals.

A Recipe for Potato Knishes

A Typical Jewish Baked Dumpling and Free Info on How to Render Fat


The Jewish love their knishes and a knish is a dumpling filled with some delicious foods, such as potato,meat or cheese. They are baked or fried and a traditional serving at Hannukah, but can be eaten anytime of the year. Knish vary in size from the small bite size to the larger ones, that are served as a meal.

The are pretty easy to make and similar to the Middle Eastern "Meat and Cheese Pies" which are filled with spinach, potato, meat and cheese. Both of the recipes are pretty simple. This recipe uses the Middle Eastern dough recipe with the Jewish filling. A delight for all to enjoy.


Instructions for the Knish

Ingredients for the Dough


  • 3 cups of flour
  • 1 cup of yogurt
  • 1/4 cup of virgin olive oil
  • 2 teaspoons of baking powder
  • 1 egg
  • dash of salt
Place the flour on the table and make a well in the middle. In the middle add in the yogurt, oil, egg, salt and baking power. With a fork start stirring the flour with the inside ingredients gradually. Mixing more and more of the flour at a time. After all the flour and other ingredients are mixed together take some warm water and add enough to make a smooth ball.

Knead the bread for five minutes more until the dough is pliable and soft. Cover the ball with some more olive oil and place a bowl on top of the bread ball. Let the dough rise for 2 hours or until doubled.

Potato Filling
  • 3 large onions
  • 1/4 cup of ghee or butter
  • 1/4 cup of rendered chicken fat
  • 3 pounds of potatoes
  • Salt and Pepper to season
Place the fat and the butter in a large skillet and saute the onions until lightly golden brown. Place the potatoes in a sauce pan with water and bring to a boil. Boil them till they are soft. Drain the potatoes and add the onions to the potatoes and any oil left and mash. Season with salt and pepper
Cheese Filling
  • 3 medium onions, peeled and chopped
  • 3 tablespoons of butter or ghee
  • 12 ounces of cream cheese cut up
  • 2 pounds of dry-curd cottage cheese
Saute the onions in the butter until golden brown. Once the mixture is cooled, add in the cream cheese and the cottage cheese. When thoroughly mixed, chill in the refrigerator.

How to render fat

You can purchase chicken fat at the market and make your own. It is called schmaltz. Place the chicken fat and some skin with a little water in a frying pan. Cook this over low to medium heat, until the fat is liquid and the bits have shrunk in size. The bits of fat should be crunchy and small. Strain the fat and place in the refrigerator.

How to make the Knish

Divide the dough in to two pieces. Take the one piece and roll out very thinly into a rectangle. Add a thin rope of filling on the dough and roll up and seal. With a knife cut the dough into individual knishes, around 2 inches long. Bake in a hot oven at 425 degrees until lightly brown. This should take around 20 minutes.

Note: Alternative ways to fold - roll out the dough in a rectangle and using a pizza cutter, cut the dough into sections. In the middle of the dough place the filling and fold the dough over. With a rolling pin, roll the dough flat. fold again on both sides and on the ends and roll with the rolling pin. Brush with some egg wash.


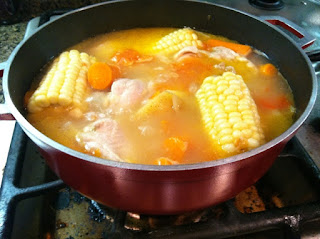
Caldo de Pollo - Mexican Chicken Soup

A Traditional Meal Served With Jalapeno and Cheese Cornbread


Caldo de Pollo is a very easy chicken soup with large chunky vegetables and served with jalepeno and cheese Mexican Cornbread. The soup is low fat and very delicious.

Chicken soup is delicious and healthy anytime of year. This traditional soup is easy to make and very filling. The vegetables can be interchanged depending on each person's preferences.
Note: For a vegetarian soup, simply leave out the chicken and add more vegetables.


Caldo de Pollo - Mexican Chicken Soup

Ingredients for the Soup
  • 2 chicken breast
  • 1 whole potato, cut in half
  • 1 whole piece of corn cut in half
  • 4 carrots chopped in 6 inch pieces
  • 1 large zucchini, cut in large chunks
  • 1 whole onion quartered
  • 1 cup of chicken broth
  • Salt and Pepper to season with

Method for Preparing the Soup

  1. Place one liter of water in a pan with the two chicken breast and bring to a boil.
  2. Add in the vegetables and the chicken stock. Season with the salt and pepper.
  3. Bring the soup to a boil and cook the soup until the chicken is well done and the vegetables are tender.
  4. Serve the soup in large bowls with half the vegetables in one bowl along with one chicken breast. Make sure there is plenty of broth for dipping.

Ingredients for the Mexican Cornbread

  • 1 cup of cornmeal
  • 1/2 cup of brown flour
  • 1 egg
  • 1 cup of milk
  • Kernels from one half ear of corn
  • 1 jalapeno or green chili
  • dash of salt
  • 1/2 tablespoon of sugar
  • 1/2 teaspoon of soda
  • 1/2 cup of cheddar cheese, shredded
  • 1/4 cup of butter

Method for Preparing the Cornmeal

  1. Place the cornmeal, flour,soda, salt, sugar, egg and milk in a bowl and with a wisk, mix well. Add in the corn and diced jalapeno peppers and mix well. Add in half of the cheese and blend into the mixture.
  2. Melt the butter in a skillet. Pour half the butter in the cornmeal mix. Brush the butter all around the skillet to coat all edges.
  3. Pour the cornmeal mix into the skillet. On top of the cornmeal mixture, place the shredded cheddar cheese.
  4. Bake the cornmeal mixture in a preheated 450 degree oven for 35-45 minutes or until the cornbread is browned and cooked all the way through.
Mexican soup and cornbread is a typical meal in most Spanish homes. Bread is served at each meal and the spicier the better. This meal will satisfy anyone and is prepared in a very short time. The recipe can be doubled for a large family to enjoy.